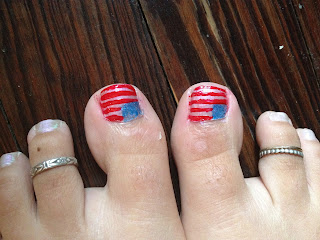
With the Fourth of July coming up in just a few days, I decided what better way to get ready for this holiday than to treat my blogging friends with a little American Flag nails tutorial? :-) In just 3 easy steps, you can flaunt this fun design, too!
 |
I used the following nail polishes to complete this patriotic design:
Basecoat: Creamy Opal (#93) by Sinful Colors ($2.99 at your local pharmacy/grocery store)
Blue Stars: Blue Glitter (BNA508) by L.A. Colors: Art Deco ($1.00 at Dollar Tree)
Red Stripes: Red (BNA519) by L.A. Colors: Art Deco ($1.00 at Dollar Tree)
** Can't find the L.A. Art Deco nail polish? Use polish you have on hand with a Wooden Dotting Pen. It works the same, if not better! Check out this one, available for $2.12:
2. Draw a small square in the right corner of your nail, closest to the cuticle with the blue deco brush. The Art Deco line by L.A. Colors is amazing in that it provides you with an easy-to-use, long pointy brush. What makes it even better is the fact that they're periodically sold at the Dollar Tree! If you don't have a Dollar Tree near you, Sally Hansen sells a nail art pen for around $4 at your local drugstore. They work just as well!
3. Draw on your flag's stripes with the red deco brush. Start from your cuticle, drawing a line at the very top. Don't worry about covering your cuticle or skin with polish, that's easy to clean up with a cue-tip and some nail polish remover later on when your artwork is dry. Work your way down, making sure to have a stripe placed against the bottom of the blue square, like that of the USA flag.
Add some clear topcoat once these layers are dry to ensure your design won't chip, and there you have it! Super quick, yet super cute American Flag nails, patriotically done for your Independence Day festivities! What's more is that they look great on your toes, too!
So, what do you think? If you try it out, be sure to send me your pictures, or link back to this post so I can see your work! :-) What ways are you getting ready for the 4th of July? Leave a comment with your ideas below!
I wish everyone a very happy holiday this Wednesday, and hope you enjoy whatever you have planned! Stay safe and have fun :-)
XOXO,
Sarah B Texas
------------------------------------
This post has been featured on:


Love the toes!!!
ReplyDeleteThank you! They're my favorite, too :-) The best part about summer is decorating your toes and wearing open-toe shoes!
DeleteSuper cute!
ReplyDeleteThank you! :-) Thanks for stopping by! Hope you have a great 4th of July!
DeleteLove this decal on the nails...adorable. I also love your new blog layout..did u do it? I am working on doing a new logo for buttons and business cards and am looking around for good programs.
ReplyDeleteIrish
Hey Irish!
DeleteThanks for the compliments :-) I only did half of my blog layout. If you look at the very top left corner of my blog, there is a clickable button for "Cutest Blog on the Block." This is where I got my page background and the background image for my banner. I did, however, modify the banner image to personalize it, and centered the banner through my own html. I also used my own html to create the color and font choice of the page itself. So, part of it is my own, but only through personalization :-)
Hope you find something you like on their site! They have a lot to offer for free :-)
Wow- I've never seen that before!! I'm impressed that you did it yourself! Happy 4th! Thank you for linking up!
ReplyDeleteThanks, Megan! :-) And thank you for hosting!
DeleteCute little toes! : ) Happy 4th to you and your family!
ReplyDeleteThank you, Brandi! Happy 4th to you, as well :-) Thanks for stopping by my blog!
DeleteGood job doing it hands free... I use tape :)
ReplyDeleteThanks, Kimberlee! :-) Tape is a great idea... I might need to go and purchase some for future desings!
DeleteThanks for linking up. That doesn't look too hard. I still am planning on doing something patriotic on my nails, but I am not sure what.
ReplyDeleteYou're welcome! Good luck on whatever you decide to do! I would love to see pictures :-)
DeleteWow, that design looks so intricate! I especially love how it looks on your toes!
ReplyDeleteThank you, Rachel! Have a very happy 4th of July! :-)
DeleteThanks for stopping by my blog, I appreciate the support!
they looked awesome
ReplyDeletevisit nichollvincent.blogspot.com
have a great weekend!
Thank you! I'll visit your blog shortly!
Delete